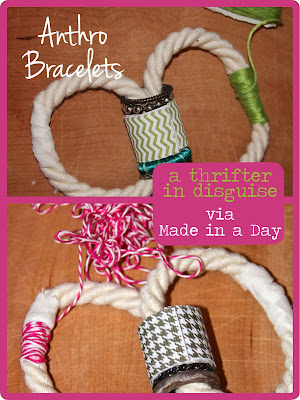
Anthro-Style Rope Bracelets
made using Made in a Day tutorial
 When I first saw Kim from Made in a Day's Anthro-inspired rope bracelets, I was immediately in LOVE! I believe I called her a genius. And I could not get those beautiful bracelets out of my head! So off we (me and B3) went to the craft store(s).
First stop was Joanns. I got the rope there (in the by-the-yard trim section near the curtain materials). I got three yards because it was pretty cheap ($2.99/yd) and I used my 40% discount (I still have about a yard left after making these). I looked at the beads and stickers there, but I couldn't find anything that had a wide enough opening for the rope. So I plopped the baby back in the car, drove across the road to Michaels, and resumed my search there.
Michaels' selection was much better for this particular project (although I generally prefer Joanns--you can use more coupons, and I like their app better... but, I digress). I found the same beads Kim used, and I even used the same cardboard tube (from the neon bracelets in the $1 section). I couldn't find the same stickers she used, but I found these, and I was happy with them. I also decided to try washi tape on one, too (the blue ikat pattern). I used the floss/thread in the pic because I liked the colors and they were pretty inexpensive, but you could do it with whatever kind you wanted.
And so, the process:
- Cardboard Beads: I had some issues cutting the cardboard neatly. Partly because I'm a bit of a klutz, and partly because our kitchen knives are really dull... should probably fix that, but thinking about sharpening them kinda freaks me out. Anyway, I got it done, but you can see in the pics the edges are pretty rough. Oh well. I used a glue gun to tape the stickers around (no glue gun for the washi bead, though). That part was pretty fun!
- Stringing the Beads: Pretty self-explanatory--just don't forget to do this before you glue the ends!
- Gluing Ends: I'm not very good at fine motor stuff, so the gluing of the ends was a bit messy for me, but the floral tape definitely helped cover up those messes (I'm not exaggerating--mess!). I'd never used floral tape before, but it was cool: very malleable and forgiving. I found in it an off-white color, so that was a bonus.
- Wrapping: Yep, Kim mentioned this: it's a little tricky at first. You can see from my pics. At first I was working with a complete knotted mess, and I had to stop to untangle every few rounds. Not too fun. But then I got into the groove and approached it a little more neatly (and slowly-see green thread example). It was tricky covering the tape with no gaps, so I just went back over it in the other direction to cover everything I missed.
Linking up to:
Made You Look Linky
Craftionary
Frugal Friday
Do Something Crafty
Friday Flair


These are fantastic!! What great gifts. Thanks for sharing on our Brag About It Tuesday party. Please stop by again and share more great ideas. ~~ Sharon & Denise
ReplyDeleteGreat job! I love the blue one! I hope you linked it up so I can feature them!
ReplyDeleteKim~madeinaday
Congrats! You are being featured on Made in a Day's Linky party! Thanks so much for linking up last week!
ReplyDeleteKim