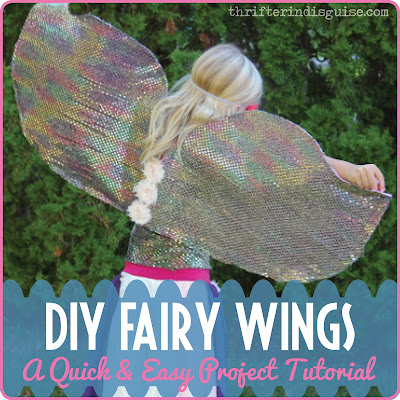
Shimmery & Shiny Fairy Wings Tutorial
This Easy Project Is Sure to Delight!
As promised, here's the final (and really, most important) tutorial for the Whimsical Fairy Costume. Fun and easy, there's not too much sewing involved... and you will likely embark on a new relationship with your glue gun :)
As with most of my projects, I like to get the most bang-for-my-buck in a "time" sense. So basically, whichever seems to be the fastest path is the one I'll likely take. My kids won't be showing excessive care with any of their costumes, which I totally realize and am okay with--they're kids! So striving for perfection with these costumes is not excessively important to me.
That being said, there are probably plenty of ways to do this (and plenty of ways to do it better!), but here's how I made these fun and pretty Fairy Wings:
Fairy Wing Materials:
- 1 yard felt (I used light pink)
- 1 yard sequin material (ours is rainbow-ish)
- 1/2" wide elastic: Cut into the following lengths: 2 x 8", 2 x 4" I used white elastic because that was all they had (plus I'm going to have her wear a white t-shirt under her costume anyway), but if you can find light pink, that would look great)!
- 8 Felt Rectangles about 1" x 3/4" (these are optional)
- Hot glue gun
- Modge Podge
- Foam Brush
- Flowers/Accessories (for center of wings)
Fairy Wing Instructions:
- Draw Out Shape: Measure your little fairy's arm-span and cut your felt to (approximately) that length. Next, fold your felt fabric in half. Use posterboard (to cut and then trace around) OR draw with chalk directly on the felt (like I did), and draw out the shape of your fairy wings. You can see, I played around with a couple different shape options and ended up using the shape in the second picture. I really liked the first shape better, but I realized it would be harder for the wings to keep their shape while she was wearing them. Simpler = better for this one.
- Cut Out Shape: Once you draw out your final design (I used chalk so it would come right off), cut around it.
- Measure and Cut Your "Shiny" Fabric: Fold your shiny/sequin fabric in half WRONG SIDES TOGETHER. Place your wings, folded in half, on top of your sequin fabric. Pin and cut around sequin fabric. I cut it so that it created 2 pieces. I found it easier to work with two smaller pieces than one larger one. Put this fabric to the side for now.
- Pin Elastic Pieces for Shoulders: Some of these measurements will depend on the size you are making, so use your discretion if something seems off. Here are the measurements I used: -Measure 6.5" IN from the center point of the wings. Mark there.
-Next, one wing at a time, make the following marks:
-Following that 6.5" line down, measure and mark/pin a spot about 5" from the BOTTOM of the wing (both sides).
-Following that 6.5" line up, measure and mark/pin a spot about 2" from the TOP of the wing.
-Attach and pin your 8" elastic pieces to those markings (see below).
- Pin Elastic Pieces for Finger/Thumb Holes:
-Measure in 1" over and 1" down from the side tip of the wing. Mark/pin there.
-Measure 2" from that point, mark/pin there.
-Attach elastic to pins, allowing elastic to "bow" to make a nice loop for a finger/thumb hole.
- Sew Elastic to Felt: This is also where those optional felt rectangles come in. I chose to cover the ends of the elastic with them, but it's not necessary. Either way, sew a small rectangle over each end of the elastic pieces you secured with pins.
- Adhere Sequin Fabric to Front: I used the Hot Glue gun for this, and I just went SLOWLY around the top edges first, smoothed it out, then went along the bottom edges. You could sew this piece, too, but I was looking for the quickest fix, and I didn't want to deal with the quirkiness of the sequin fabric and the sewing machine :)
- Trim Excess Fabric: You probably won't have a perfect felt-to-sequin match, so use fabric scissors to trim away any excess.

- Add Flowers/Trim to Cover Seams: I used the same flower ribbon (cut into 3 separate pieces) I used on the top and skirt to cover the unsightly seams.
- Paint with Modge Podge: You may notice now that the wings are a little droopy, and that may not bother you, but I wanted to firm them up a little, so I applied a layer of Modge Podge with a foam brush. This helped to stiffen them up a bit!
- Allow to dry overnight, then WEAR! This shape would also be perfect for some angel wings, too!
She loves that she can make a little cocoon with them too ;)
Happy crafting!
Want to complete the outfit? Check out the Whimsical Fairy Costume Skirt and Shimmery Fairy Costume Top, too!
Or for more easy Halloween ideas, check out these posts, too: DIY Witch Costumes, DIY Shark Costume.
And hey, are we connected yet? If not, find me on Pinterest, Facebook, and Google+, and Bloglovin so we can start sharing ideas together!


No comments:
Post a Comment
Note: Only a member of this blog may post a comment.