Bedroom Bunk Style For Kids
An Easy & Fun Bunk Bed Upgrade
Got bunk beds? Can you sew a straight line (or if you can't sew, can you iron a straight line? Stitch Witchery works, too!)? Then you can totally make some cute bunk curtains. This easy project will supply endless hours of fun for your favorite kiddos.
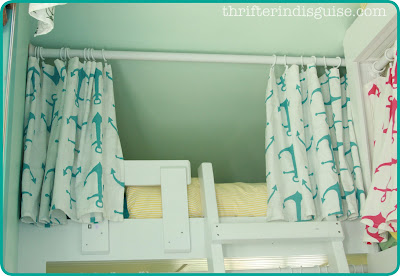
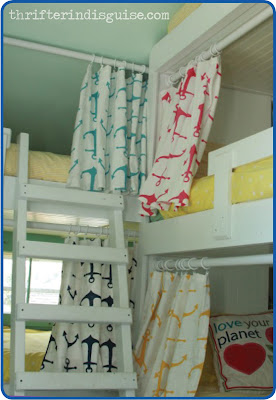
Last summer we hired a carpenter to make these custom bunk beds for the kids room in our cottage. We've got six people living in less than 1000 square feet, so optimizing what space we have is essential. Enter: awesome 5-bunk structure.
And as if the bunks weren't fun enough as they were, this summer I (finally) fitted them with some curtains. My original intent was just to add some privacy since the room is shared between all the kids, but I soon realized the kids appreciate the curtains more for play than practicality!
Check out how I made the curtains (easy) and how we (ahem, Ben) hung them below:
Easy Sew Bunk Bed Curtains
Materials:
I got my supplies at various stores, but to make it easy for you, I'll give you some links to find similar products on Amazon--just be sure to check that the sizes and colors are to your liking! FYI, I participate in the Amazon Services LLC Associates Program, an affiliate advertising program that helps bloggers like me earn a little bit of cash by advertising and linking to Amazon.com.
Instructions:
(repeat for as many as you need; don't forget you need # of Bunk Beds x 2):
- Measure Fabric: You'll need 2 panels of fabric for each bunk. Size will depend on the height of your bunks (all 4 of ours are different), but here's how I measured: Length should be enough to cover your space PLUS about 4" for seam allowance (this will give a wider hem which is what I was going for). Width is a little tricker--I used this formula for my panels: (ENTIRE WIDTH of bed (in inches) ÷ 2) + 2".
- Pin Fabric: On the side edges - fold the fabric over about 1/2", then fold it over again and PIN down your edges. On the top and bottom edges - repeat process but create a longer hem by making your folds about 2" (or whatever you need to achieve the look you want).
Here's how to pin the corners (this is also a good pic to see how my bottom hem is wider than the side hems:
- Sew: Sew around the perimeter. I used a zig zag stitch because I thought it would be more likely to hold up to the (inevitable) abuse of my kids. Whether or not that theory holds true... we shall see.
To Hang Bunk Curtains:
Now that your panels are made, you'll need to hang them. And this proved to be a bit of a pain.
What NOT to use: Originally, we tried to use a curtain wire, and Ben mounted these ones from Ikea in each bunk. And it was a tedious process. And I felt guilty the whole time, because this was my bright idea... but I really wanted to hang them, so I acted as cheerleader the whole time ;)
And when he (finally) finished, and we hung the curtains on each bunk, the kids were overjoyed! They immediately jumped into their beds to play, and when my 5-year old went to get down from her bunk, she sat back and put her weight on the curtains... and the wire immediately ripped out. And Ben fixed it... again, a tedious process... and guess what happened? Yup. They kept ripping out. And the kids weren't being too rough either, just playing as kids do. So we had to scrap the curtain wires and come up with Plan B.
Here's a not-so-great photo of the Ikea wire issue... forgive me, I was NOT in the mood for pics during this process ;)
Plan B - Curtain Rod and Socket: We realized we needed something durable and strong, so we decided to get 1.5" wooden dowels (cut to size from a big-box store) and hang them in wood pole sockets. The mounting process, while straightforward, was again a bit tedious, and we also had to spray paint the wood white, but (knock on wood) we have not had another curtain-falling disaster.
Next, hang your curtains with Curtain Ring Hook and Clips:
And here's is a pic of the rod and sockets close up:
All-in-all, it was a pretty straightforward process; the hardest part was mounting the sockets and rods, but if you go into it knowing that, you will surely avoid the multiple occasions of defeat that Ben experienced.
The kids love them, I love them... totally worth all the work!
I'd love to see yours when you get them done!
Check out these other easy and fun DIY projects for kids:
 |
| Refinished Children's Chair |
 |
| Vintage Kids Desk Makeover |


No comments:
Post a Comment
Note: Only a member of this blog may post a comment.